Impala SS/Caprice Lens Bucket Modification
for
focused/increased rear lens candlepower output
and
Fix for "dim" middle (add-on) brake lamp phenomenon
(C) 1998-2008 Marvin Davis
In looking back at ways to increase the lamp power output in the Impala's rear lighting system, bulb replacement was the only real option to accomplish this. Using #3496 Krypton, 30W Halogen or 50W Hi-Power Halogen bulbs are the three currently available basic choices from the stock 2057 (32cp/2cp) brake/turn signal bulb.
In addition, a fix or correction for the 'dim' middle bulb phenomenon when adding the middle brakelight is described in detail at the bottom of this page.
What is a Krypton bulb you ask? A krypton gas filled glass envelope allows the filament to burn more efficiently for a given amount of electrical power. Yes, they are more expensive and thus more energy efficient. If you would like to see an actual comparison (bulb survey) between the stock # 2057 bulb and the Stanley # 3496, then CLICK right here.
When using the 30W Halogen bulbs, and adding two for additional brake light/turn signals (in stock or sequential turn signal systems), you are operating the rear electrical system (wiring harness, brake pedal switch, turn signal switch, etc.) at its "maximum" power rating. GM did not oversize or engineer the rear lighting system to handle higher power demands than what is normal in a "stock" setup. Also, the quality and workmanship of the rear electrical system does vary from Impala to Impala as I can personally attest to. You may experience different brightness effects between passenger and drivers side and with or without parking lights on. In using the super hi-power 50W bulbs means you will have to modify the rear wiring harness and control components to handle 300W of power needed to make those bulbs operate properly. We are all very familiar with the need for a heavier wiring harness to allow for higher power head lamps, as the stock head lamp wiring harness is rated for use only with stock power rated bulbs. Why should the Impala SS rear lighting system be any different??
In doing research into different ways to increase the candlepower output and to utilize bulb efficiency, I found the #3496 is a superb choice to do this. For only a few watts more electrical power, you get up to 34% more actual candlepower output over stock brake/turn signal bulbs. In the case of the parking lights, you get 40-50% more light output. This is highly desirable because the addition of the two bulbs in a sequential turn signal system pushes the power requirement of the wiring harness up considerably and on some cars shows up problems (connections, bulbs, battery) that are car related. Stock Delco battery, AUX battery power/fuse box connections and rear harness ground bond problems start to show up.
ATS-System III design changes and enhancements
In looking at ways to literally squeeze more light out of our Impala rear lighting systems, and take actual footcandle power readings to document and 'gauge' the improvements, I feel and can show that this (ATS-III and Lens Bucket Mod) will provide the Impala or Caprice owner with the brightest rear brake/turn signal and parking light system using close to the same electrical power and exceeding the candlepower output of any Halogen bulb using the #3496. I have actual foot candlepower readings with an industrial measurement device to show relationships between before and after lens bucket modification.
The ATS-III modules have been updated to the latest HD V-FET TMOS(tm) switching technology to provide for the absolute highest power rating and efficiency (module rating now 46A). This came about for a request for a high power system to provide control for a "dual sequential lighting system" for custom trailer wiring harness. The trailer was specially built to match the paint, styling and rear lighting system to provide a 'matching' impala trailer. This provided control for a matching rear sequential system on the trailer to mirror the Impala installation. Additional features and options are noted as well on ATS-III lighting system page here on this site.
Lens Bucket Modification
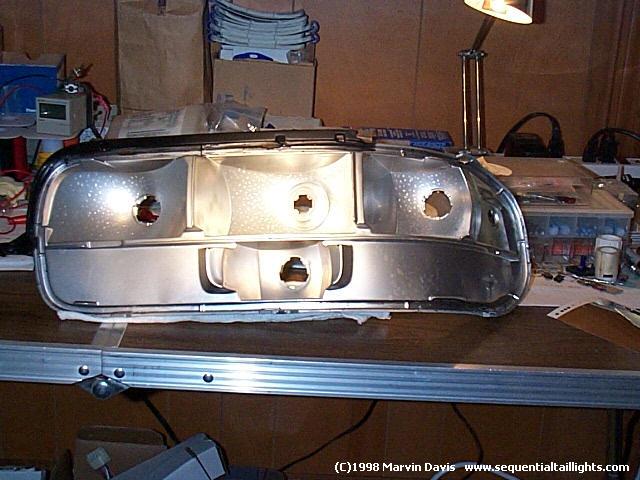
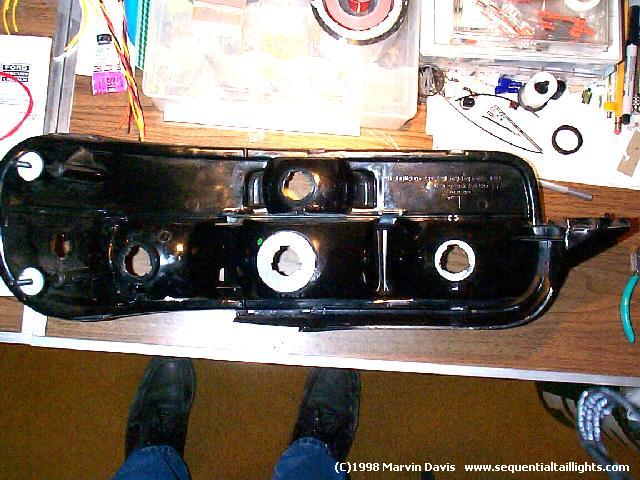
Another viable way to squeeze more light power out of the rear light system is to improve the reflective and focus properties of the lens reflector assembly (buckets). The red plastic lens can be separated from the bucket assembly by removing the red lens. It is not permanently sealed as a black rubbery putty is used along with a few plastic tab clips to hold the assembly together. Using a small flat knife, I was easily able to separate the lens from the bucket and remove the old sealant and clean up the joining channels for later reassembly. Once I separated the assemblies, I was disappointed in the overall quality and construction of the reflectors. Silver reflective paint sprayed over the plastic reflectors with small star impressed dimples for refraction is all that is in there. The paint literally wiped off in my fingers and did not have very good "reflective" properties on direct visual inspection. Below are some basic pictures of the before and after on a reflector bucket.
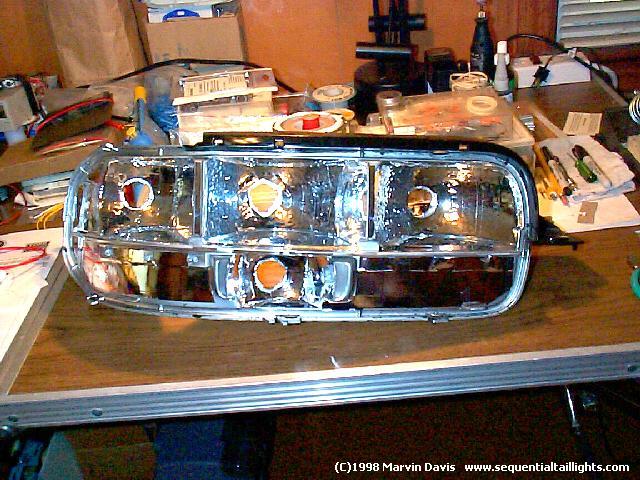
My digital camera had a difficult time in a close up focus but you can plainly see silver spray paint that does not reflect light all that well (even with a flash here!) and a small strip of aluminum separating the bottom backup light housing. The silver paint came off readily and easily with a rag and some Isopropyl alcohol. I also noted the different sizes, directions and angles that the three brake/turn signal bulb bucket housing were focused/aimed at. Filament position also plays a role in the lamp reflector efficiency. Below is an "after" picture with the Chrome/Mylar mirror reflector tape installed.
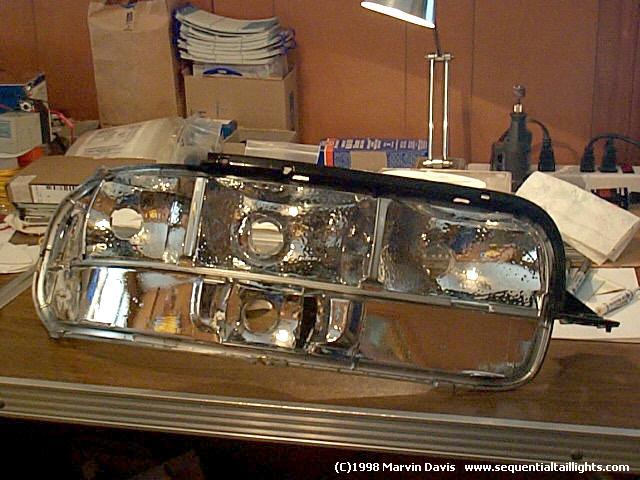
Here I had to use room light to grab a picture would not take using a flash due to so much more reflective properties on the buckets now. Laying them side by side was striking in its obvious improvements. The mirror reflective tape used is made by 3M and comes in various sizes and rolls. Different thicknesses were used to follow the molded bucket as closely as possible and temperature resistance is important here as well. I tested the installation with a hair dryer to elevate the temperature to simulate lamp heat and to speed curing time of the tape adhesive. Depending on what your pocket book can stand for the reflective tape at 50-80 deg.C ratings, I chose the middle rated temperature ranges to see how well it will hold up over time and so far there is no problem in using the #3496 bulbs.
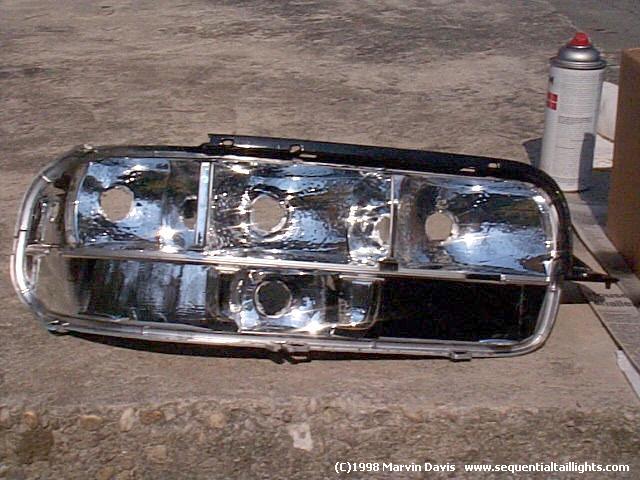
Outside shot of the same lens bucket getting ready to have the red filter lens placed back on it.
Light Measurements?
Watts are not light. Watts are used to measure electrical power and in lighting systems is used in conjunction with a term called Efficacy. Efficacy = Lumens/Watts for a ratio of light output to electrical power input. This measures how efficient a system is as to how much power is consumes. Different types of light use different amounts of power and have different costs to operate.
Quantity of light is measured in Lumens, Footcandles, and Candlepower.
Lumen: Measure of Light Flux or "volume".
Footcandles: Density of Light Striking a Surface (level of illumination)
Candlepower: Intensity of Light
Power Output/Footcandle test results
The following bulb and lens assembly lumen power survey was conducted using a General Electric Model 214 (color and cosine corrected) light meter with direct measurement readout in footcandles. Reflector upgrade was accomplished using
hi-grade chrome/mylar reflector tape used for industrial photocell detector application(s).
Stanley #3496 LENS OUTPUT measurements in Footcandles
BEFORE Bucket MOD:
| Output in FC | Outboard |
Driver Middle |
Inboard |
Inboard |
Passenger Middle |
Outboard |
|---|---|---|---|---|---|---|
| Parking light | 50 | 50 | 50 | 50 | 50 | 50 |
| Brake light | 220 | 195 | 240 | 240 | 190 | 215 |
| Backup | Backup | |||||
| Stock #2057 | 750 | 750 | ||||
| Krypton #3496 | 940 | 930 |
AFTER Bucket MOD:
| Output in FC | Outboard |
Driver Middle |
Inboard |
Inboard |
Passenger Middle |
Outboard |
|---|---|---|---|---|---|---|
| Parking light | 60 | 75 | 60 | 65 | 75 | 60 |
| Brake light | 280 | 300 | 300 | 300 | 300 | 275 |
| Backup | Backup | |||||
| Stock #2057 | 900 | 910 | ||||
| Krypton #3496 | 1000 | 1000 |
Approximate average CP upgrade in performance is;
[Stock reflector bucket]
(1) Brake filament from 2057 to #3496 is 30%
(2) Parking filament from 2057 to #3496 is 50%
[Modified reflector bucket]
(1) brake filament using #3496 is 'additional' 34% with most improvement in center lamp bucket output.
(2) park filament using #3496 is 'additional' 20% with most improvements in center lamp bucket output.
(3) Smallest increase was on outside lens bucket(s) due to smaller physical size reflector.
So, in short, you get more candlepower output for close to the same wattage used on upgrading to #3496, but when "combined" with reflector upgrade as well you get another 30% increase with much brighter (+100%) backup lights and center bulb output. Rear lamps appear to display multi-faceted lens characteristics as opposed to solid 'dull' lamp illumination. This look is considerably more eye appealing and distinct. Backup light output displayed the most of all with a whopping 100% improvement!
You can now get the "halogen" hi-power bulb look without the problems of wiring harness, brake switch, turn signal switch ratings and overheating sockets. Now, it will take some patience and time as I did spend about 8 hours in doing this whole job and noting what I was doing and taking readings. One of the interesting "side effects" if you will, is the viably appealing "jeweled" effect provided by the internal red lens itself. This is near invisible using the stock reflectors but when enhanced to focus the bulbs better the refraction through the red lens now looks like it has facets or a jeweled effect!
This was quite noticeable at night as well and gave the sequential system another big boost in the looks department! Well in closing here, all I can say is that if you have the time and a few bucks to do it, you won't be sorry with the results and especially if it is incorporated with the most powerful and efficient sequential turn signal system available, ATS-III.
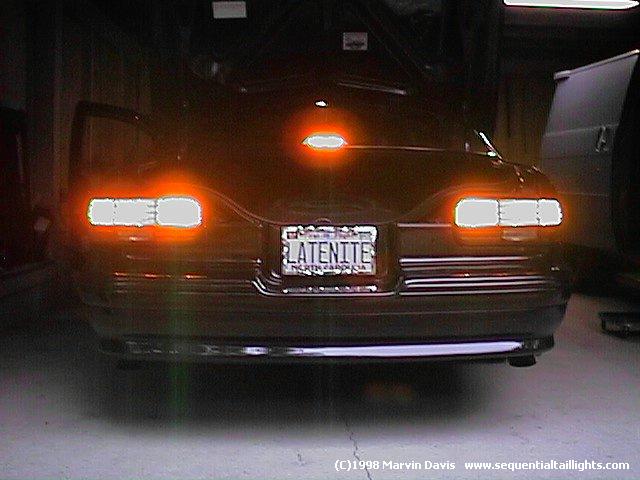
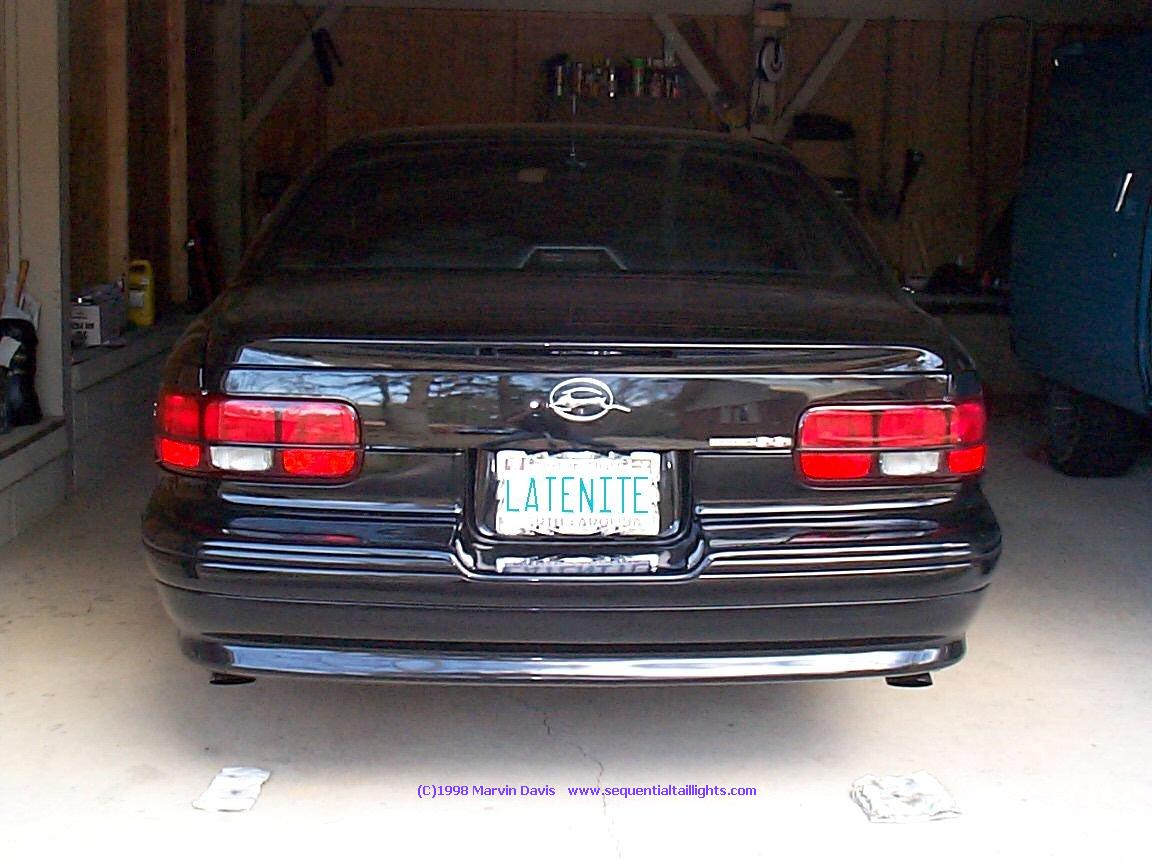
My digital camera wouldn't capture all the neat lighting effects but here is a shot of the rear at dusk with the brakes on and it really doesn't show the rear "brightness" of the rear lamps as there is nothing else in there to associate or compare it with but I will include it here for you anyway. Note, as you walk around the rear of the car, the angle of viewing causes the faceted or jeweled effect to make the lens seem to glitter. I sure wish they would have done this from the factory. Seeing is believing!
Information on Improving Center Brake Light Characteristics
Over the past two years of modifying the rear lights on the Impala/Caprice (GM B-Body) cars, I have noticed on occasion that on many installations the center brake light appears to be 'dim' in relationship to the other two brake lights when adding the middle socket. When viewing the lights close up this is not a real problem but when viewing the lights (especially at night) from a distance greater than 30-40 feet, it looks or appears that the center brake light is dim or less bright than the other two. In doing more testing and research I have determined the reason for this.
The original design called for a recessed socket using a #194 (2cp) peanut type bulb whereby the placement of its filament is in the same relationship as the other two parking light filaments in the reflector housing. This 'offset' allowed the focus pattern of this bulb to closely match that of the other two parking lights. When drilling out the middle parking light and sticking in either a GM or universal socket type socket places the parking light AND brake light filament in a radically different focal point. This changes the dispersal pattern of the light coming out of the center (bucket) reflector. Its not too apparent close up but at a distance it is easy to now see.
For some Impala/Caprice owners this is no real problem or issue but for some they want their lights to look their best and as close to factory as possible. Some replace the center brake light with a #3496 higher CP bulb and leave the other two brake lights as stock with #2057 bulbs. This helps the light balance but does not really correct the focus or diffusion at a distance. The best and only true way to correct this is by physically moving the center bulb filament(s) to the same physical relationship (and focus) as the two partner brake lights. In my efforts to continually improve the LBM modification, I did some lengthy experimentation and have developed a solution.
This basically involves the following process;
Step (1)
Using a dremel tool (or equivalent) remove the entire recessed portion of the center parking light right up to the edge of rear bucket. If you have the outer red lens removed, you can easily see the edge of the center section from the inside. You can clearly see this 'edge' I speak of in the first bucket picture at the top of this page.
Step (2)
Mount a new socket plate (pictures of parts below) made of 10 gauge aluminum (1/8" thick) that is 2-1/4" in diameter that is drilled out and keyed for the "recessed back" GM socket using a high-grade bonder like Loctite 410. Make sure you have rotated the large key so that it is in the same relationship as the large keys on the outer two GM sockets. Using a bead of bonder, place the adhesive on the back and side edges of the socket plate. I use quick set bonder accelerator #712 (or #713) to fast cure the bonder. In less than an hour, they are hardened or set and ready for mounting.
Step (3)
In using the recessed back GM socket (Niehoff or General Automotive p/n 34960), this will allow the parking and brake light filament(s) to be located at the same distance (approx. 1") from the rear of the reflector. This will produce a focus pattern almost identical to the other two lamp buckets. Now it will not be necessary to use a different CP bulb to get a more balanced output or focus pattern. All lamp bucket outputs or bulb intensity will look the same.
Step (4)
When placing the buckets back in the car, be sure that you add a second gasket to the center socket to make it snug and tight in its hole. Then twist/rotate it so that the rear of the socket is in the same physical position as the other two for proper filament alignment. The filament must be perfectly vertical in the bucket/reflector. I usually mark the back of the socket with a green dot and the socket end with a green dot so I can exactly position them.
So, in short you must physically modify the center bucket to move the bulb to the correct location for proper focus and light diffusion. This is kind like a flashlight that you can twist the lens bezel and make the flashlight put out a bright small beam or a wide floodlight type pattern. Its the same exact principle.
Here is a shot of the new socket plate attached to the rear of the rear of the bucket housing.
Here is a shot of the inside of the bucket with new high-reflective material added. Note that the recessed area is now completely removed.
Subsequent testing showed no decrease in overall candlepower output but dramatic improvement in focus pattern to match that of the other two brake/parking lights. The "dim" center bulb characteristic has now been eliminated entirely.
Information on materials and alternatives
The chrome or aluminum reflective film(s) are considered to be a specialty product and you may have to check all of the automotive stores in your area to find a suitable material. More than one type of material will do the job for you. The key here is good reflective properties (>90%), good heat resistance and adhesive backing. Be sure to clean ALL of the loose paint out of the buckets to get good adhesion.
I mentioned that I used 3M industrial reflective tape or film used in photocell industrial applications, but there are many vendors/mfg. of chrome/mirror reflective tape and film's that are applicable here.
I also picked up a roll of CHROME-BRITE from my local "Parts America" Auto store and noted that its heavy duty and should work effectively.
CHROME-BRITE, Mfg.=TRIMBRITE Products, Part # T-1818, 3" x 60" Chrome roll with adhesive backing.
Also in the 3M Product and Service Directory there are these commercial & industrial films with the following descriptions;
Film, 3M(tm) Silverlux Aluminum Reflective
A high-performance specular film; mirror-like aluminum reflective
high-strength film with adhesive backing.
(Construction and Home
Improvements Div.)
Film, 3M(tm) Silverlux Silver Reflective
Silver film applied to existing fluorescent lamps to increase light
in buildings
(Construction and Home Improvements Div.)
Film, 3M(tm) Solar Reflective
Solar optical product. Specular silver reflective film used in thermal
solar collectors. Silver-metalized, weatherable acrylic film has total
solar reflectance of 94% at air mass and is used extensively for
concentrating solar collectors.
Web site: http://www.mmm.com
The 3M Help line with product and distributor info is 1-800-3M HELPS. Depending on what "strength and quality" you want and what you wish to spend, there is a lot of ways to go. :) I just demonstrated one way and the measured results.
In addition to the vendors/manufacturers above;
Another company, Gerber Scientific makes a high quality reflective mylar film with adhesive backing that comes in 15" wide by X ft. in length (a 3' length piece will do both light buckets with some left over if you need extra. This metalized polyester film has >90% reflectivity and good quality adhesive as well.
Here is their contact and order information.
Gerber Scientific Products
151 Batson Drive
Manchester, CT. 06040
Phone: 860-643-1515
Product info: Reflective Film, 15" metalized polyester SHINY SILVER.(obtain a 3 foot length piece.)
If you find suitable materials or alternatives, let me know the information and I will post it here as well.
Disassembly/Assembly FAQ
Q: What sort of sealant do you use when putting the lenses back together?
A: I used black RTV sealant available at most automotive stores (I got mine at a local Advance Auto Parts) under the brand name; VersaChem, Black RTV Silicone sealant TYPE 270, in a 3 OZ tube.
You will need 2 ea. tubes to adequately do the job.
>Also, will the new seal be weather resistant?
Provided you clean all the old putty out and put a bead in the sealant channel so the lens can touch the bead to a depth of 1/4", you will have no problem. Technically, the lens is not sealed air tight as it has two drain holes/slots on the bottom edge to allow any water that migrates in to drain out via gravity feed. All you should be concerned with is the top and side mating surfaces be sealed effectively. If you do not care to use silicone sealant you can use and alternative windshield tube-seal sold on a roll. This is very simular to the OEM sealant.
Q: What did you use to clean the cheap aluminum color paint off the buckets?
A: I used ISOPROPYL rubbing alcohol in a spray bottle and a lot of clean white cotton 'shop' rags. I soaked the rags and the plastic reflector and scrubbed good until I no longer saw any paint coming off onto the rags. You want to get as much of the paint off as possible but I found that I got good film adhesion once the surfaces were clean. You want to leave the plastic dimples in place and intact to aid in bucket refraction properties.
Breakage??
This mod may not be for everyone and requires a good level of patience and attention to detail in prep/cleaning and application of reflective materials in the buckets. As, I've done several for folks, you will find that you will have one or more of the plastic alignment tabs break when separating the lenses from the buckets. So you will need Loctite #404 to repair them for re-installation. GM has designed the lenses only to be replaced, as that is the only reason you would ever take them down, but you may get lucky and have no breakage. Take your time and go slowly and have patience in doing this mod.
< New Information as of 04-15-99! >
Lens Bucket Modification to Impala SS and Caprice Lenses
SS Folks,
Due to a steady demand for me to do the "Lens Bucket" modification to the stock Impala_SS lens, I have decided to purchase several sets of lenses and make them available to those who wish to upgrade their rear lights to higher efficiency and footcandle power output utilizing the excellent #3496 Stanley Krypton bulb.
You can purchase lenses directly from me already modified, or ship me yours for and exchange set. If you cannot do without the car for any length of time, I will have to charge you the cost of the lenses at the current price and refund you the amount when I receive yours to add to my stock.
GM Pricing subject to change without notice, call Dal Slabaugh for the latest GM pricing.
Dal Slabaugh (parts cheap) 877-448-5451 mailto:lockitup@bright.net
1994-1996 Impala_SS Lens Assemblies
(lens and bucket, bucket not available seperately)
| GM Nomen | GM Part number | Approximate Price EA. |
| COMB.LAMP Assy LH | 5977447 | 152.86 |
| COMB.LAMP Assy RH | 5977448 | 152.86 |
1994-1996 Impala_SS lenses only
| GM Nomen | GM Part number | Approximate Price EA. |
| Blk/Bezel Lens LH | 16522451 | 108.18 |
| Blk/Bezel Lens RH | 16522452 | 108.18 |
1991-1992 Caprice Lens Assemblies
(lens and bucket, bucket not available seperately)
| GM Nomen | GM Part number | Approximate Price EA. |
| COMB.LAMP Assy LH | 5977151 | 152.86 |
| COMB.LAMP Assy RH | 5977152 | 152.86 |
1991-1992 Caprice lenses only
| GM Nomen | GM Part number | Approximate Price EA. |
| Blk/Bezel Lens LH | 16520511 | 58.09 |
| Blk/Bezel Lens RH | 16520512 | 58.09 |
The "GM" price of the lens may change without notice here. But this is the best I can do unless you can find a better deal and drop ship them to me for modification.
For those who return me their lens and buckets in good/undamaged condition I will refund/mail the cost of the lenses to them via certified money order within 5 working days. Since I am not running a business on this and am doing it as a sideline, this is the best I can do here. The cost of the LBM-II mod is $125.00 plus shipping. I will then be able to guarantee the footcandle power output using the #3496 bulbs as published on my website.
The Impala_SS lens assemblies are kind expensive?? Yes, and the price is going up steadily over the past 12 months. I guess the demand for them is going up as well. I do not see this going down in the near future however.
Alternative Lenses (earlier 1991-1992 Caprice style)
What about the "alternate" lenses I mentioned? I have taken the earlier (91-92) model Caprice lens that has three distinct separations for brake/turn signals and modified them. Testing has shown that these produce another 20-25% footcandle power output due to their lens "design". The smooth lens design is not obstructed by ribs and painted lines such as the later 1993-96 design. This ribbed design has lines painted in the lens exterior and thick reinforcing plastic ribs on the inside which block light from exiting the bucket. Since light cannot pass through the ribs, it reduces overall footcandle power output by as much as 25%. Thus the earlier design puts out more because light is not obstructed by paint and thick ribs.
Also, I liked them so much, I painted the chrome center trim black (to match my BBB) and with the ATS-III high efficiency system, they produce a striking and different sequential turn signal system. Many who have seen them like them and note that they provide a more traditional (3) light "look" of previous model chevrolet Impala's.The smooth look also fits the body style more as well.The bottom reflector section is clearly seperated from the upper section dividing the functions more.
The later "ribbed" design kind of looks strange to some, due to only the "top half" lighting up and there is a less distinct seperation between the upper lighted section versus the lower reflector section. Some folks have drilled holes and added #194 peanut bulbs in the bottom reflector section to make it "light up" and making the whole assembly one huge parking light. Again, here tastes vary from owner to owner and to what look they are striving for.
Here are a few examples via thumbnails, click on one to get a full size picture.

Here is a shot of a side by side 'mixed' set
Here is a shot of the modified Caprice style set.
I can provide several hi-res JPG pictures of them installed and you can see how you like them yourself. Some will like them, some will not. I plan on leaving mine on for a unique and distinctive appearance in combination with the LBM and ATS-III lighting system.
Here is the breakdown on pricing;
Due to recent GM pricing increases on all B-Body rear lighting, you need to contact these folks if you wish to purchase new light assemblies as pricings change frequently now. RMS Auto at: http://www.rmsautoparts.com or Jason Cromer at: http://www.samtaylor.com
All written material, pictures and technical information (C)1997-2008 Marvin Davis
All rights strickly reserved, use or reprint prohibited without expressed permission
Questions or comments can be directed to me via email webmaster@sequentialtaillights.com
![]()
Back to my Homepage