Can a “Push button Start be
added” if your R/T Challenger does not have this?
Depending
on whether or not the vehicle is an 8 or 6 cylinder engine, this answer could
be a 'yes'.
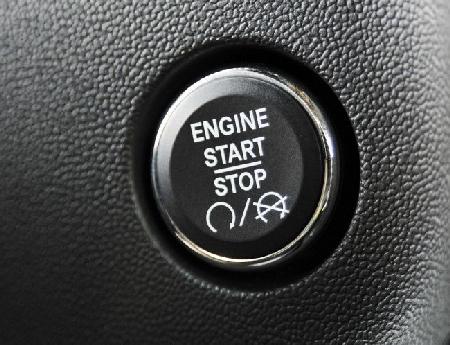
Many have thought that they can purchase the plastic “START/STOP”
button and install it in their WIN ignition module and you will have it.
(Push button part #:
1-1FU931X9AC) Unless your Challenger is
set up for “Keyless Go”, it will not work.
The Keyless Enter-N-Go is a complex and complicated system. Adding this to a car that does not have this
is possible, but is expensive and very time consuming.
So what
exactly is needed?
Here is what is required for your Challenger to be modified for
Keyless-GO system operation:
(1) EVIC: The software version installed does not matter. That is just for
display. Without EVIC
everything works just fine. When you press the start button once, all your
accessories will
come on. A second press and the car will start.
The WIN Ignition Module: (Push
button part #: 1-1FU931X9AC)
(Wireless Ignition Node) also
does not matter. Any WIN will work. But if you want to have the
REMOTE START, the WIN RS antenna
and under hood switch (Part # 05026211AA) will have to be installed.
The FOBIKs: (Part# 05026457AF - Latest Rev.) They are designed
for "Keyless GO".
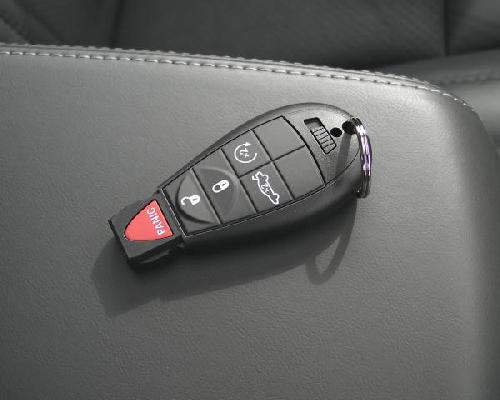
There are 2 types of FOBIKS. If
your car did not come with Keyless GO, then you have “BASE” FOBIKS. They will
never work with Keyless GO.
You have to have two new type Keyless
GO FOBIKS. The Keyless GO FOBIKS have more electronics inside that receive
commands from the PEM
(Passive Entry Module) Keyless
Go Key Fobs (05026457AF) 5 button
FOB (this FOB has remote start and is the fob for the RT/SRT8)
OR
You could also use part #05026567AE, this is a 4 button FOB, it
does not include the remote start feature. (Remote start can also be added
easily, you just
need the proper Hood switch (Part # 05026211AA ) and
then program the vehicles computer (TIPM) for "remote start".
Once the FOBIK's have been
married to a vehicle, they cannot be married to another WIN. It will not work.
It changes the programming information
inside the FOBIK as well and it
will never be able to be used with another WIN. Be aware of that if you intend
to buy a used FOBIK as you will not be
able to program it to your car .
You must only use Virgin FOBIKS. There is a way to "de-kit" FOBIKs and
return them to a virgin status, but you have
to
have the right software, and a test box that will program the key. This is not
something even a dealership can do. Also, the WIN will be able to accept
up to 8 FOBIKS total, so you can
keep your 2 original FOBIKS, and then add up to 6 more, or erase your original FOBIKS and program up to
8 new ones.
If you opt to keep your original
2 programmed to the car, they will never work with Keyless Go, but they will still perform as they do
now.
Only the New Keyless go FOBIKS
will allow you to start the car with the Start/Stop Button (SSB).
However to program
new FOBIKS to your current WIN, you will need to know your PIN number. You
should have gotten a card with your car when you
purchased it that has your PIN
number on it. It is probably with your
owner's manual. That will have a 4 digit PIN. It is possible that you did not
get it
though, as I did not with my
car, but don't despair, the dealer can look up this number and get it based on
your VIN number. The dealership uses the
number when getting security
access to the WIN to program new FOBIKS.
(3) The PEM Module: (Part
# 05026443AF - Latest REV.)
You need a PEM installed on the CAN-B Bus for the system to work. The PEM is
attached to 2 LF antenna's.
One is under the back seat and one in the Instrument Panel. So you will have a
total of three antenna added including one for remote start (WIN).
To install the PEM. Remove your glove box, and look around under
there. The harness connector for the PEM
is under the dash, up behind the glove compartment area.
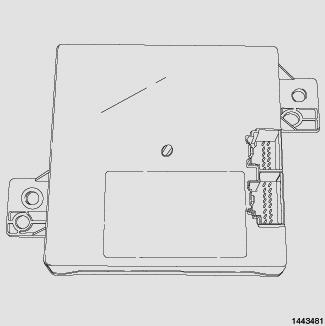
PEM (Passive Entry Module)
(4) System Programming
The next step will
be how to activate the system and program the new FOBIKS.
System Programming:
That needs to be
done with the StarScan tool, or star mobile. With the
StarMobile tool, the tech can come right to your
house and do this. It will take about
15 minutes to do this either
way. Not all dealerships have the StarMobile, so call
first and see if they can do it. All they have to do is connect to your OBDII
connector, then set you up.
Activate the system and program
the KG FOBIKS.
All the next steps need to be performed using a StarSCAN
or StarMobile tool. This just connects to the
vehicles OBDII port. Any dealership with this tool can perform
this, however, bear in mind that this system is very new, and most dealerships
do not have much experience with it yet, so it might be a good idea to bring
these
instructions with you to make sure they complete all the necessary steps. If
done properly, it will only take about 10 minutes to do this.
OK. Now everything should be installed, but the car does not yet know that the
PEM is there. Until it knows that the PEM is installed, it won't know to route
CAN BUS
messages to and from it, and it won't even see it.
1. SET the TPIM to see the PEM.
With the StartScan or StartMobile
connected to the vehicles, At the main screen, select the ECU View button.
The next screen will show all the ECU's in the vehicle.
Select the TIPMCGW
ECU.
Next, Select the TIPMCGW with
the green checkmark next to it.
Next select the button
Read/Write Data.
Select the row Programmed ECUs:
Cabin Network.
Scroll down to PEM, and change
it from Not Set to SET. This will enable the PEM in the vehicle.
(Note: as long as you are at this point, you can also enable Remote Start if
your vehicle does not have that
option set as well. Just hit the back button and go back to Read/Write Items.
Select the row Vehicle Config 1, and
then scroll down to the row Remote Start Present, and change that value from Not Set to SET. Go Back again, and
select the row TIPM Configurable Inputs.
Select the row Reconfig Input#4 (B10)
and change that value from Not Present to HoodAjar -
Analog. That's it.
The vehicle will now work with remote start once you install the hood switch, which you can get from
MOPAR for
around $19)
Now the vehicle will see the PEM.
2. Program New FOBIKs to the WIN.
With the StarScan or StarMobile,
go to the Select ECU screen again.
Select the ECU called WCM. Now
select the row with the green checkmark.
At this screen , ECU Overview -
WCM, select the button called More Options.
Next select the Button, Onboard
Routines. This will bring up a list of special routines for the WIN.
Next
the tech needs to click the button called Session Control, Select Extended
Diagnostics Session, then click
Start. (A Sparkplug Icon will
appear next to Tester Present, No response required. Close the window.
Next click the
button ECU Unlock, select the number 3, then click Unlock. Close that window.
(Note: Once you have unlocked the WIN with security level 3, you will have 60
seconds to complete the
programming procedure, and then the security access will turn off. For this
reason, you will usually have
to repeat this process for each FOB to be programmed)
Now that you have gained security access, If you have installed a new WIN, the
new WIN will learn the
vehicle configuration from the TIPM.
Now select the row PIN and click the Start button. Click on Edit Item and enter
your PIN. (0000 if a
virgin WIN). then click OK. Then click Start to send the PIN to the WIN.
(Optional: If you intend to replace ALL FOBIKS, at this point select the row
ERASE Programmed Keys/FOBS, then
select Start. Once the erase is complete, the cluster will chime.)
Click the row Programming Mode, then click Start. A window will open, select
the row, Entry Option then Edit Item.
Select PROGRAM KEY, then click OK.
Insert the virgin FOBIK into the WIN, turn it to the RUN position. The SKIM
light on the IP will go from solid to off
and the cluster will chime once the WIN has learned the FOBIK.
If more than 60 seconds have passed, you will need to go back through the
procedure again to start programming
mode again. (Unlock ECU, Enter PIN, Enter programming mode.)
Do this until all your new FOBIKS have been programmed to the WIN (8 FOBIKS
max)
3. Activate the PEM.
With the StarScan or StarMobile
tool, go to the Select ECU screen and select PEM.
Select the row with the green
checkmark.
Next screen, select the More
Options button.
Next screen, select the Onboard
Routines button.
Next screen, select the Session
Control button, select Extended Diagnostic Session then click Start. (A
sparkplug icon
will appear next to Tester
present, no response required), Close window.
Next select the button ECU
Unlock. Select the number 3, then click the button Unlock.
The PEM is now unlocked and security access has been granted. The
PEM will automatically learn the vehicle configuration.
Leave the PEM in security access mode to perform the next step.
4. Transfer the FOBIK information from
the WIN to the PEM.
With the StarScan or StarMobile
tool, Go back to the Select ECU screen.
Select the row WCM.
Next select the WCM with the
green checkmark next to it.
Next screen, select the More
Options button.
Next screen select the Onboard
Routines button.
Once again, select session
control, Select EXTENDED DIAGNOSTIC SESSION, and then click START.
(A spark plug ICON will appear
next to TESTER PRESENT, No Response Required.) Close that window.
Next select the ECU Unlock button, and select 3, then Unlock. Under Onboard
routines, select the row PIN, and then
click the button START. Click on the PIN row, then click the button EDIT ITEM,
enter your PIN then click OK (Almost
forgot, The PIN you enter here will be 0000, because this is a virgin PEM. If
it had been installed at the factory, it
would be the same as the PIN in the WIN).
Click START to send the PIN to the WIN.
Now, under Onboard Routines, select the row called Transfer Secret Key and Key
IDs (Passive Entry Module).
Then click Start.
Once that routine completes. you are done!
Now
the system should be working.
(5) How it all works:
With the Keyless Go FOBIK inside the car, when you press the Start/Stop push
button (button cover on WIN), the
WIN requests info from the PEM. Then PEM
send a command out of the LF antennas to find any valid FOBIK inside
the vehicle.
If a valid FOBIK “hears” the PEM request (via LF antenna), it messages to the
WIN (via CAN-B bus) and allows a
“engine start” request to then be sent to the PCM.
(1)
Once installed, the dealership
can use the StarScan/StarMobile
tool to “marry” the new FOBIK's to the WIN and
also transfer the info to the PEM, and update the vehicle sales code
information via dealer.net.
(2)
The Keyless GO system will now
work.
If you wish to add this feature to your car, it is difficult because you need
the right tools. Any “skilled” Chrysler
Service department can do this.
Once installed, the dealership can use the StarScan
tool to marry the new FOBIK's to the
WIN and also transfer
the info to the PEM. Then it will work fine.
Bear in mind that these instructions are only for the 8 cylinder engines.
Remember that KG is not an option on the 6 cylinder engine. The WIN will send
an AF command when the SSB is
pressed, to the Engine computer to start it. Sending an AF command to the 3.5L
will “not start” it.
To put this system into the 3.5L, the WIN has to be modified (flashed) with a
prototype software from Chrysler.
This was when they were considering this as an option for 3.5L engine.
So this installation and setup is not an “easy” thing to do! You are looking at several hours of labor,
about $700
or so in hardware. This would easily
cost a grand to do including labor costs.